OK, so you went on a snowboarding trip to Switzerland and you took tons of videos and photos with your GoPro, now comes the real deal: How to edit GoPro videos like a PRO! Well you have different options, I personally use the “MOVAVI Video Editor 10” for quick editing which is really simple to use and don’t require any previous experience with editing videos. Some people use the GoPro Studio which honestly I don’t like since it’s super slow and crashes a lot. I also use the Adobe premiere for more advanced editing.
Here, I will show you how to create an amazing video using the MOVAVI video editor so you can share it with your friends and family. If I can do it, you can do it too. It’s not that complicated, I promise 🙂

1- Copy the videos from your GoPro to your computer (create a folder with the trip location, date and add Unedited, ex: Switzerland_20150725_Unedited), that way you can keep all the original media backed up to your computer in case you need to access it later. Now create another folder (trip location , date and add Edited, ex: (Switzerland_20150725_Edited), we will use this folder to store our edited video(s).
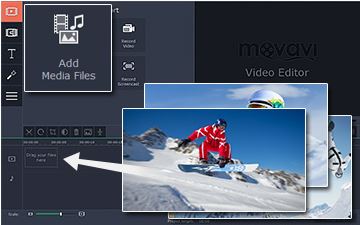
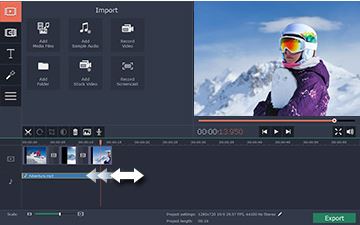
2- Open Movavi video editor, click “Add Media Files”, browse to the folder we created (Hawaii_20150725_Unedited) and select the videos that you want to edit. The files will appear on the timeline in the bottom.
3- Now you can start cutting unnecessary sections of the videos, to do that, click on the video and locate where you want to start cutting, once you find it, pause the video and click the “Scissors” button to split the video in two parts. Hit “Delete” on your keyboard to delete the video segment. If you would like to delete a segment in the middle of the video, then you need to cut the video in two: at the beginning of the section and again in two at the end of the section, then delete the segment that you don’t want.

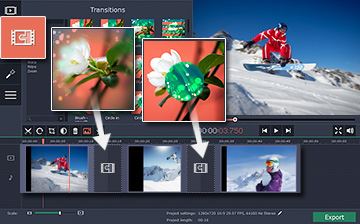
4- Now we need to setup the transition between the clips. Go to the “Transitions” tab, click the icons to see the transition preview on the windows on the right, choose the ones you like the drag and drop them between your video clips.
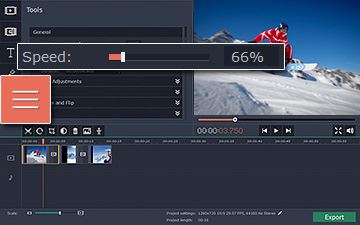
5- What I also like in this video editor is the slow motion effect which every GoPro video should have! To do that, you need to click on the clip that you want to play in slow motion and go to the “Tools” tab and click on Slow Motion and move the Speed slider to the left to reduce the speed of the video. You can also speed up the video which is a very cool feature that I use a lot in most of the videos I create.
6- After the slow motion effect, it’s time to add some background music to your footage to make it more awesome! To do that, Click on Add Media and choose your favorite audio track for the video, it will be added to the timeline. Try to find a track that is longer than you video or if you would like, you can add multiple tracks (it’s up to you!). You just need to drag the right edge of the audio track to the left to reach the end of your video so they both stop and the same time (you don’t want the video to end and the music is still running 🙂 )
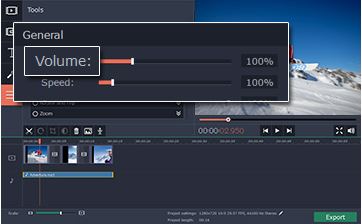
7- You are almost done! You will notice that the original recorded audio of your Gopro videos is running as well, so in case you want to remove it, you can click on it in the timeline and reduce the volume or just delete it.
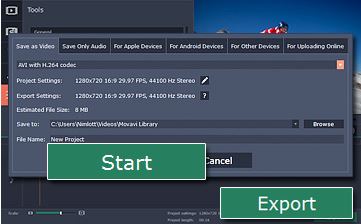
8- To save the video, click on “Export”, you will notice that you have over 90 output formats, choose the one you find most suitable, I would normally go for the 1080p 30fps if I want to upload it to Youtube or Vimeo, but again it’s up to you to choose. Then click “Start”and save it to the folder you created earlier in Step 1 (Switzerland_20150725_Edited).
There you have it folks!
Don’t forget to check my other helpful articles: Which GoPro Should I Buy and Top 10 GoPro Accessories for 2015.
If you have any questions, then please feel free to leave a comment in the comments section below and I will be more than happy to help 🙂

July 28, 2017 at 7:57 pm
Great article. I filmed in 1080P at 60FPS. When I uploaded a few Gopro vids to Movavi the editor “play” feature is running at normal speed, but the video footage is lagging really bad, any suggestions?
July 28, 2017 at 11:14 pm
Weird, is it only happening with Moavi? Have you tried GoPro Studio? If it happens also in Studio, it means that your PC does meet the minimum+ requirements.
if you provide me with your PC specs, I would be able to help you.
Cheers.
June 19, 2018 at 2:33 pm
I am having the same thing with a Go-pro Here 6 at 4k 60 fps. Audio perfect, Video 1 frame every 6 seconds on the Movavi Editor 14 Plus
July 26, 2017 at 11:04 am
Hi!
Just eddited a movie from My gopro hero session 5 and upploaded it to youtube. But i can only watch it in 360p?
Please help
July 26, 2017 at 11:14 am
Hi Simon, what’s resolution of your edited video before uploading it to Youtube? and are you sure the video was 100% processed? Let me know
July 26, 2017 at 2:23 pm
Hi again.
Im filming in 1080p. And yes the video was 100% Done.
How can i se What resolution it is?
All i know is that when i edit and whatch the movie in the program the resolution is bad.. definetly not 1080p
Thanks for the quick response!
July 26, 2017 at 2:34 pm
Ok looks like you didn’t keep the 1080p resolution when editing, check the video settings in the edit section. Which editing software are you using?
July 26, 2017 at 3:04 pm
Will check when i come home.
Does it mean that i need to start Over??? :'(
July 26, 2017 at 3:15 pm
You might need to start-over if you had converted the videos to 360p instead of 1080p. Anyway, let me know which software are you using for editing and I’ll be able to help you through the process, no worries 🙂
July 26, 2017 at 4:12 pm
And What do you mean by editing software?
🙂
July 26, 2017 at 5:12 pm
Im using
1920×1080 (16:9)
29,97 FPS
July 26, 2017 at 6:28 pm
Well.. now i se What i did wrong… didnt chose quality “Good, high, highest”
Lets try highest this time haha
July 26, 2017 at 7:28 pm
Perfect, try and let me know if that fixes the resolution issue you’re having.
July 26, 2017 at 11:35 pm
Yes it sure did!
Finally
January 24, 2016 at 11:40 pm
You make it sound so easy to do this Michel! I am definitely going to try your tips with the footage I have gathered over some time now! Is Movavi a good editor for non-Gopro footage as well? If not, what else would you recommend?
January 25, 2016 at 12:43 am
Thanks Shaz! Of course, movavi is a video editor so you can use it for any type of footage. It’s very user friendly and fast. I highly recommend it.
January 24, 2016 at 1:31 pm
Awesome blog! Would I be able to do the same thing if I used VegasPro? Thanks 🙂
January 24, 2016 at 1:35 pm
Hi Khoifush, Vegas Pro is not my favorite software, I tried it couple of times and it froze while editing full HD videos (1080p at 60fps), so Imagine editing 4K videos! I would pick MovAvi or Adobe premiere. I hope this helps! 🙂
January 24, 2016 at 1:02 pm
I also have difficulty using the gopro studio because it freezes a lot and sometimes I lose my work. Thank you for this great post, I will try the Movavi and will let you know how it goes. Thanks!
January 24, 2016 at 1:06 pm
Hi Laura, it’s too bad that many people have this issue with GoPro Studio, even if your PC or MAC have have max specs requirements, the app will eventually freeze. MOVAVI will definitely help you edit your videos quickly and easily. Let me know how it goes!