If you would like to find out how to use a GoPro as a webcam then continue reading this guide to know how to do it.
Many people need a webcam to make video calls but they only have a GoPro camera. This is not an issue since a GoPro can be used as a webcam with any video chat application.

Or some of you like myself, would like to get more usage of their GoPro cameras, plus who doesn’t like a full HD video quality?
In this tutorial, I will show you how you can use your GoPro as a webcam for Mac, Windows, and Linux computers.
Most webcams don’t have the high video quality and the different fields of view that a GoPro camera has.
It’s true that GoPro was made for extreme sports but why not find other ways to use this tiny camera?
Have you ever wondered about the possibility of using your GoPro as a webcam for Skype or for live streams?
This can be annoying especially if you do live streams because your viewers prefer a crisp high definition video over a bad quality one.
I had the same problem until I figured out a way to capture the GoPro video in real-time.
I also managed to do the same setup with my DSLR.
The thing with using a GoPro webcam is that you need additional hardware.
There is no other way around this method but in return, you will get the result you want and you’ll have the awesome GoPro video quality captured to your PC.
So can you use a GoPro action camera as a webcam? DEFINITELY!
The below setup is compatible with the below GoPro cameras and any other cameras that have an HDMI port:
The Hero 8 Black will need the Hero8 Media Mod and The Hero9 Black will need the Hero9 Media Mod, the Media Mod adds an HDMI out and a 3.5mm audio ports. Check my review of the GoPro Hero8 Media Mod.
UPDATE: GoPro just released a new beta firmware only for the Hero8 Black and for MAC users that convert your Hero8 and Hero9 into a webcam without the need for either a Media Mod or any third-party accessories, so without a capture card!
To achieve this setup, just follow the below steps.
How to use a GoPro Hero8 Black and a Hero9 Black as a Webcam Without a Capture Card
Before you start, make sure you have enough space on your memory card.
- Update your Hero8 Black and Hero9 Black to the latest firmware. If you don’t know how to do it, then follow these instructions.
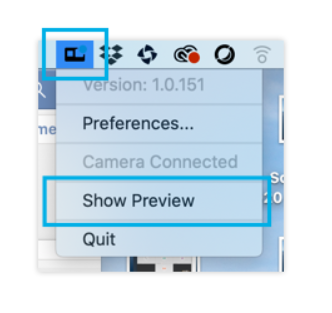
- Download GoPro Webcam utility and install it on your computer. You will see the below GoPro icon on your status bar:

- Connect your GoPro to your computer using the USB cable. aA blue dot will appear on the GoPro icon on your status bar indicating a successful connection to your GoPro, see below:

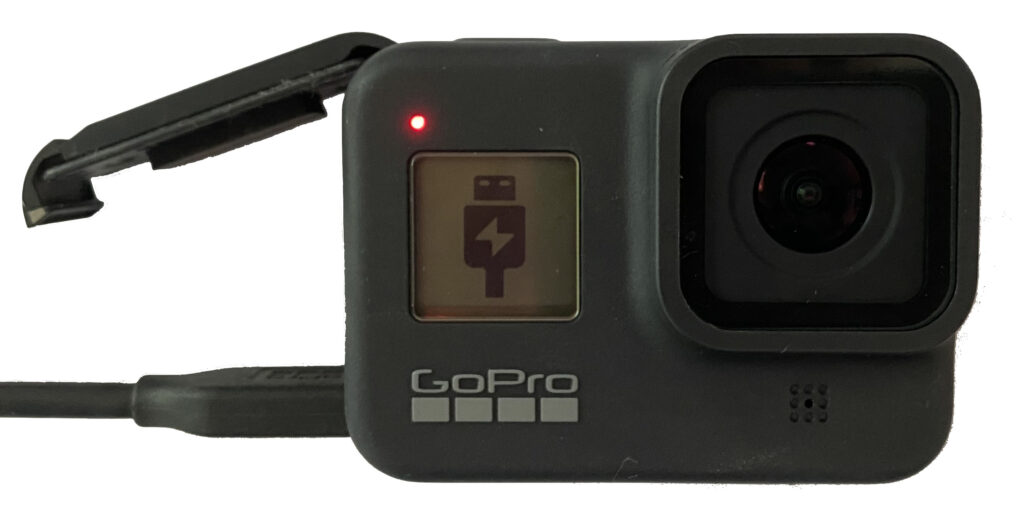
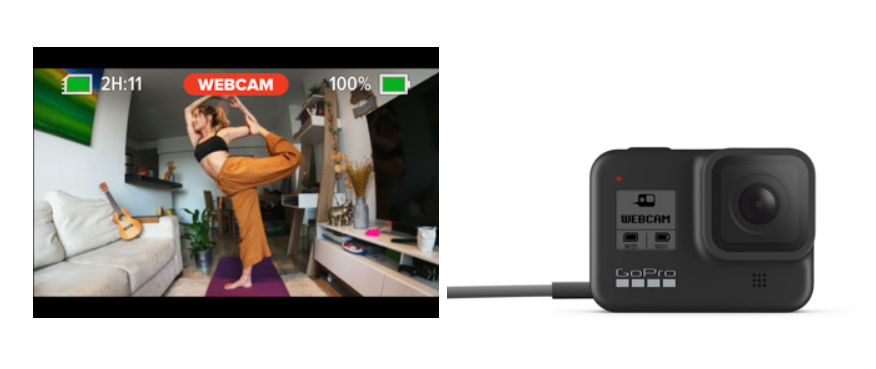
- You will notice that your GoPro will go into USB mode, see below photo:
- Click on the GoPro icon on the status bar, then click ‘Show Preview’ to see a preview of your video and adjust your angle accordingly. See below:
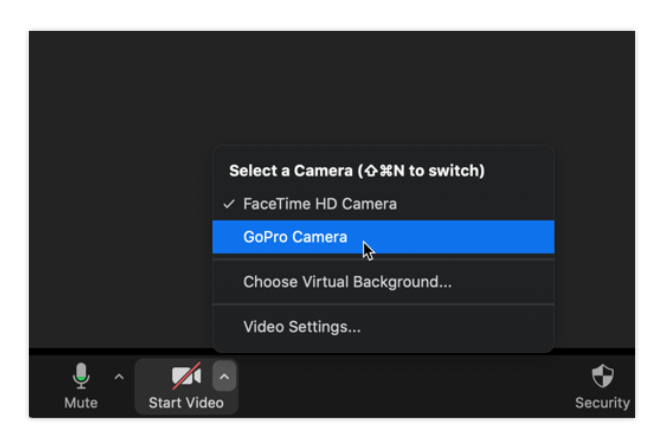
- Now open your favorite video chat app, let’s say you use Zoom, then click on the small arrow next to ‘Start Video’ to choose your GoPro camera.
- The GoPro will now go into webcam mode and start recording as shown below:
- To adjust your resolution, you can click on the GoPro icon on your status bar, then preferences, then you can choose either 1080p or 720p.
- You can also adjust the Field of View only once you start recording. To do that, click on the GoPro icon on the status bar then click on Digital Lens, then select your preferred Field of View (Wide, Narrow, or Linear).
Here’s a video that can help:
This setup works with the below programs:
- Zoom
- Microsoft Teams
- Webex (with Chrome)
- Skype
- Facetime Desktop
- Twitch via OBS
- Google Meet
- YouTube Live (with Chrome)
- BlueJeans
- Snap Camera
- Facebook Rooms
As I said earlier, the above setup is only for MAC users for now. GoPro said that they are working on a solution for Windows users that should be released soon.
Now, if you don’t have a GoPro Hero8 Black or Hero9 Black, you can still use your other GoPro as a webcam using the below method.
How to Use any GoPro with an HDMI Port as a Webcam
Here’s What You Need
Make sure you have a USB 3.0 or USB-C ports on your PC or MAC.
For Windows, Mac OS X and Linux users:
- Your GoPro, I use a Hero5 Black.
- Micro HDMI to HDMI cable
- Mini USB to USB3.0 cable (For Hero3 and Hero4)
- USB-C to USB3.0 cable OR USB-C to USB-C (For Hero5, Hero6, Hero7, Hero8, and Hero9)
- For the Hero 8 Black, you need the Hero8 Media Mod.
- For the Hero 9 Black, you need the Hero9 Media Mod.
- Video capture card, I use
DIGITNOW - OBS software (FREE)
- 2x Free USB ports on your computer (1 of the ports should be 3.0 or USB-C)
For MAC users who want to use the Thunderbolt port:
- HDMI to Micro HDMI cable
- Video Capture Card: Blackmagic Design UltraStudio Mini Recorder.
- Thunderbolt cable
- Mini USB to USB3.0 cable (For Hero3 and Hero4)
- USB-C to USB3.0 cable or USB-C to USB-C (For Hero5, Hero6, Hero7, Hero8, and Hero9)
- OBS Software for macOS (FREE)
- 2x Free USB ports on your computer
Why Do You Need a Capture Card?
Let me just explain to you quickly about the video capture card and why you need to have one.
The video capture card converts the video signals generated by the GoPro into a digital format and then gives you the ability of storing these videos on your computer’s hard drive as well as streaming the video from GoPro to PC in real-time with no delays.
Capture devices can also be used with Playstation, XBOX, Video cameras, and other devices.
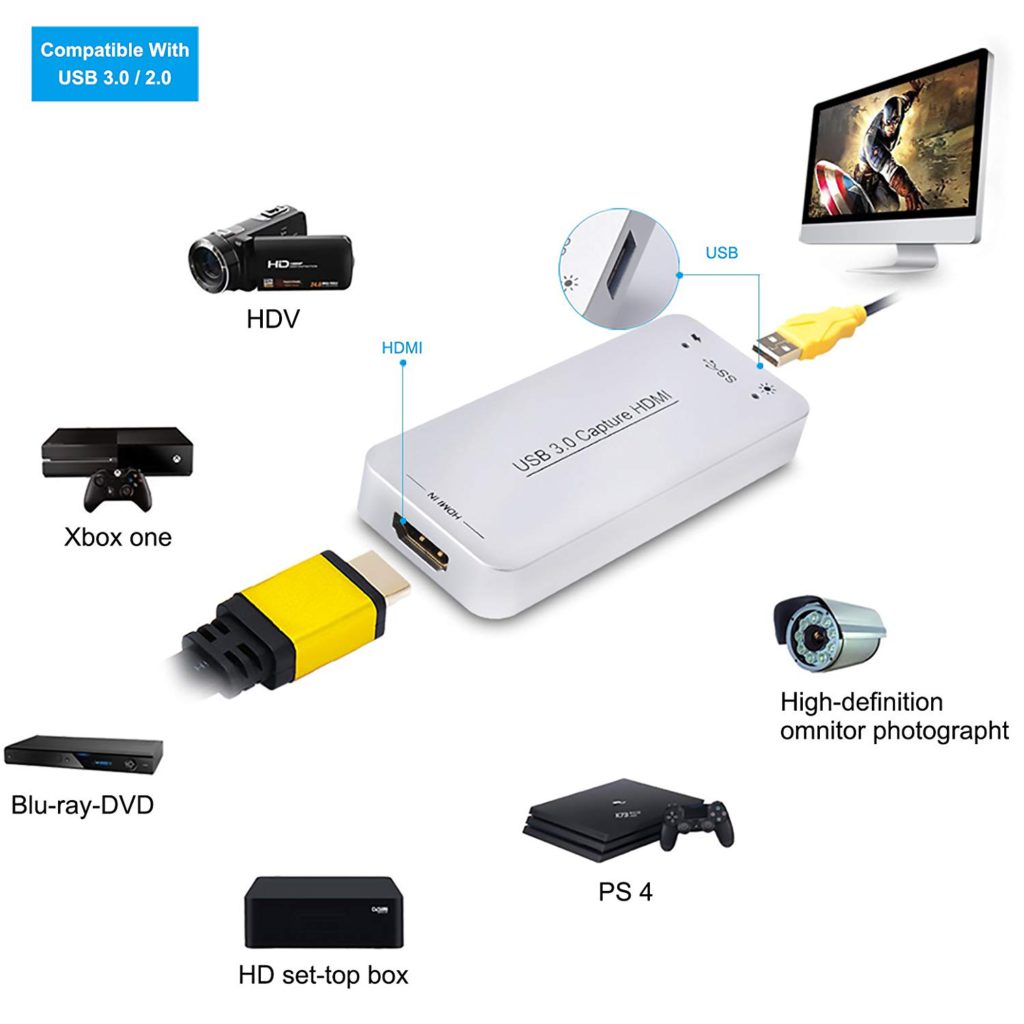
It captures the video and audio coming from the GoPro through an HDMI cable and transfers it to your computer through the USB port where you can either record it or use it for other applications like Skype, Facebook, Zoom, WebEx, Microsoft Teams, OBS, Twitch, Periscope, etc..
The DIGITNOW is an excellent quality video capture device and best seller in the capture cards market.
It is compatible with Microsoft Windows, Linux, and Mac OS X and it can capture videos up to 1080p at 60fps with no delay.
This is one of the good capture devices that I found online at an acceptable price.
You can use capture devices from brands like Elgato, Mirabox, and Magewell in case you can’t find the DIGITNOW.
If you’re using an old MAC that doesn’t have a USB 3.0 port but has a Thunderbolt port then the only device that can be used is the Blackmagic Design UltraStudio Mini Recorder.
This one is plug and play so there’s no need to install any drivers on your PC.
It’s also compatible with Windows which makes it the best choice if you have more than one operating system. It can also capture videos up to 1080p.
If you have tried cheaper capture cards that work well, then please feel free to share it in the comments section below.
Let Me Show You How To Use GoPro as Webcam with OBS and Other Software!
Step#1 – Setup the Connections
1- On you GoPro Hero5 or newer, go to “Preferences”, scroll down to find “Input/Output”, then select “HDMI Output” and choose “Live”. (This will prevent the GoPro screen from going black when plugging everything later).
2- Connect your GoPro’s USB cable to an external power source like a power bank or a 5V USB charger (this is used for power, relying on the battery life won’t get you more than 1.5 hours).
3- Connect the micro HDMI cable (audio/video data transfer) to the micro HDMI port on your GoPro to the HDMI port of your capture device.
4- Connect the USB cable from your capture device to the 3.0 USB port of your computer.
If you’re using the Blackmagic capture device then connect the thunderbolt cable between the Blackmagic and your Mac.
It’s mandatory to have a video capture card, normal HDMI ports on your computers do not capture videos, they only send OUT signals to external monitors or TVs.
Step#2 – Download and Install OBS Studio
OBS (Open Broadcaster Software) is a free open source software used for video recording and live streaming. Go to this link to download OBS Studio and then install it on your PC.
Step#3 – Set up Your GoPro
Ok so now you can power up your GoPro, Go to video settings and choose the full HD resolution (1080p at 30fps or 60fps), do not choose more than 1080 because the HDMI cable that we’re using doesn’t support the higher resolutions.
Once you’re done, go to setup/preferences and disable OSD (On Screen Display) because the HDMI output shows the time and date by default on your screen and you don’t want that to show.
To disable the OSD on a Hero5 or newer cameras, go to “Preferences”, find “OSD” then turn that off.
Step#4 – Set up GoPro to OBS
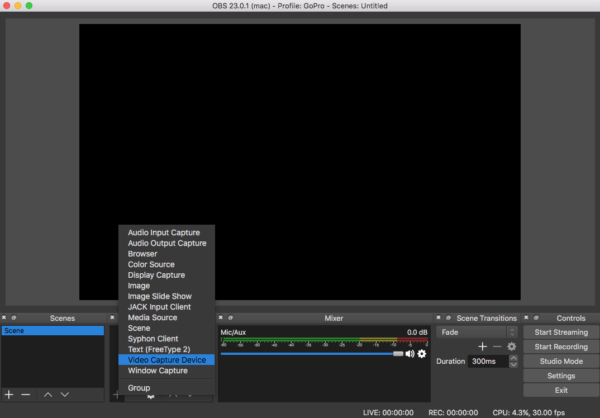
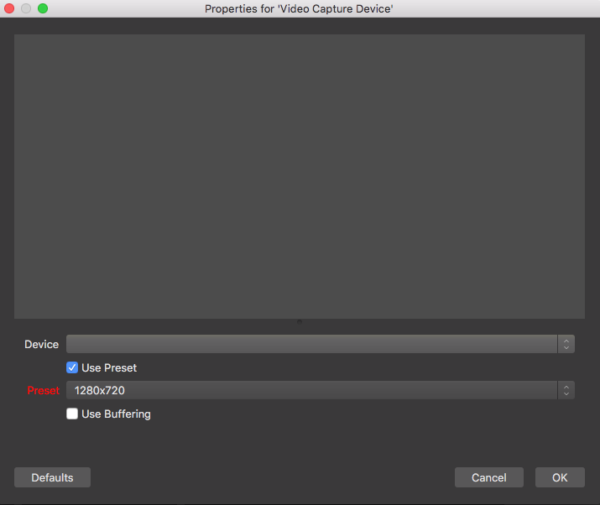
Open OBS, go down and right-click on “Sources” then Add -> Video Capture Device, You can put the device name “GoPro”.
A new window will open, select the device which is the video capture card, then under Video tick “Custom Resolution” and select 1920×1080 then for FPS select 30.
For audio, you also have to choose the capture card unless you’re using an external mic for your GoPro. Press OK and now you should be able to see the camera preview.
Step#5 – Webcam or live Stream?
For Mac computers, you don’t need to install any drivers. Skype will automatically detect the capture device once you connect everything and will use your GoPro as a webcam on your mac. Same thing for Zoom, Facebook video chat, FaceTime, Google Hangouts.
For Windows, now that everything is set up, you’re ready to use your GoPro as a webcam.
If you would like to use it with Skype, then go to Skype -> Setting-> Audio & Video -> Choose the video capture card.
Make sure to do the same in Audio settings unless you’re using an external microphone on your GoPro, then you need to choose your other audio source.
For live streaming or video recording to your PC, you would need to use OBS.
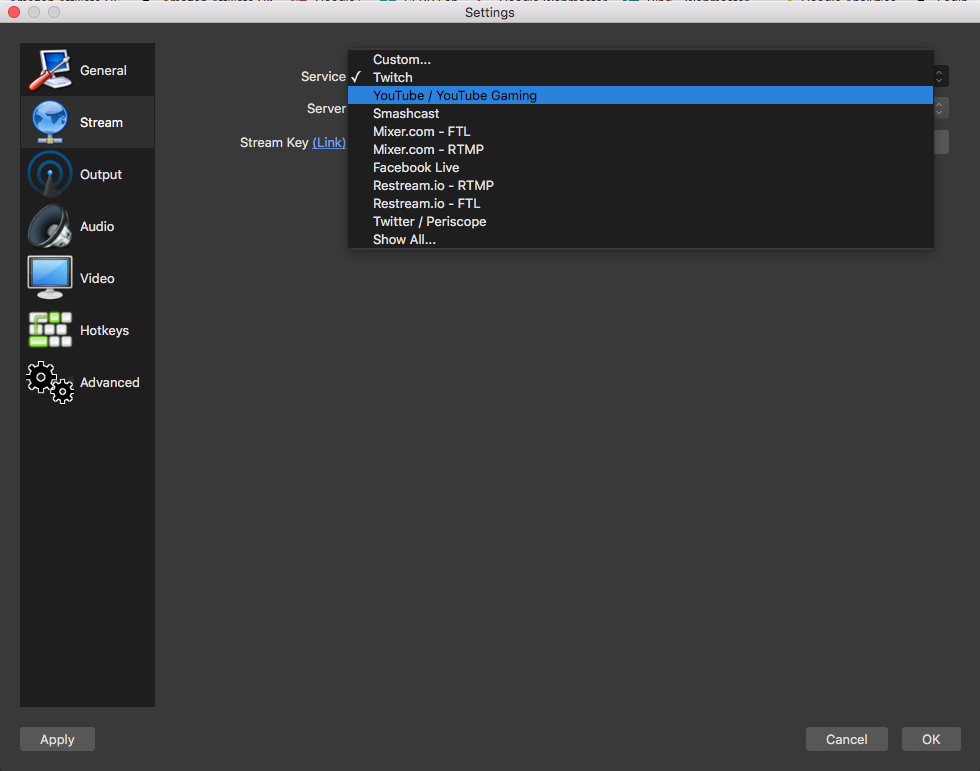
Open OBS, go down and click on “settings”, then on the left click on “Stream”, select the service you want, “live streaming” (for video streaming), Youtube, Facebook Live, Twitch, etc.. The list is long.
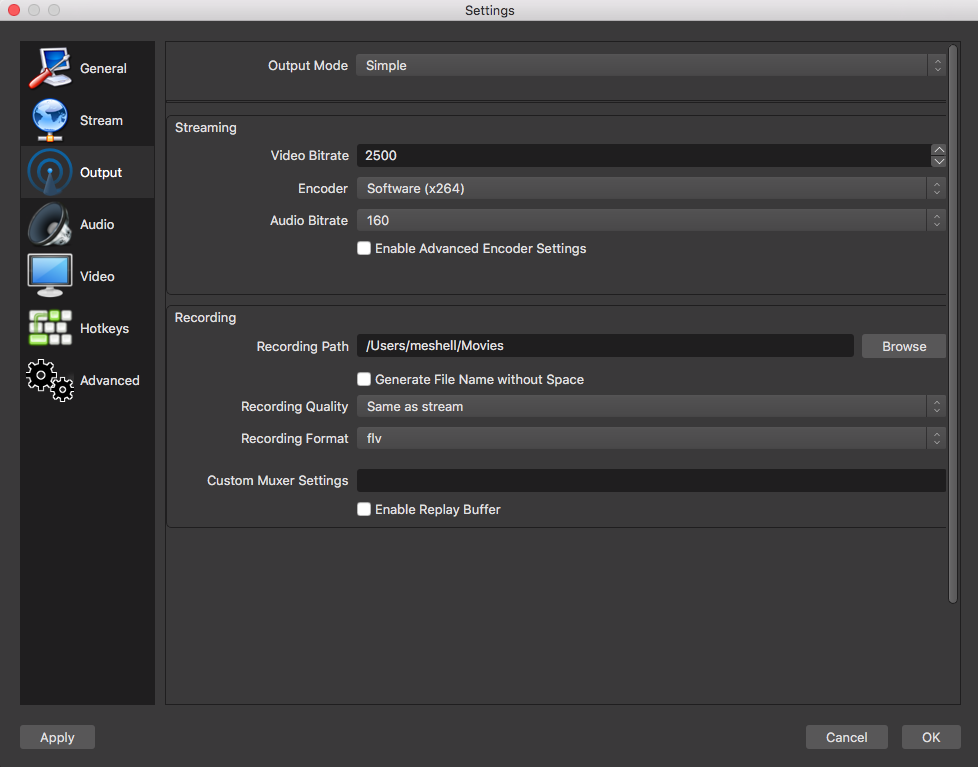
Now if you want, you can save your streamed video to your computer, just make sure to click on “Output” on the left menu and select your preferred location to save your videos.
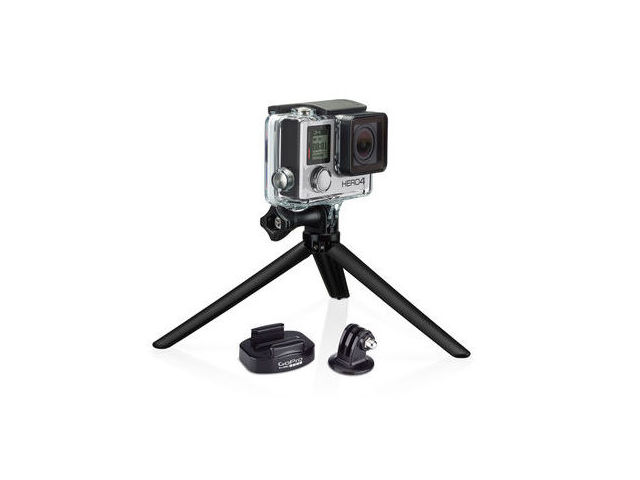
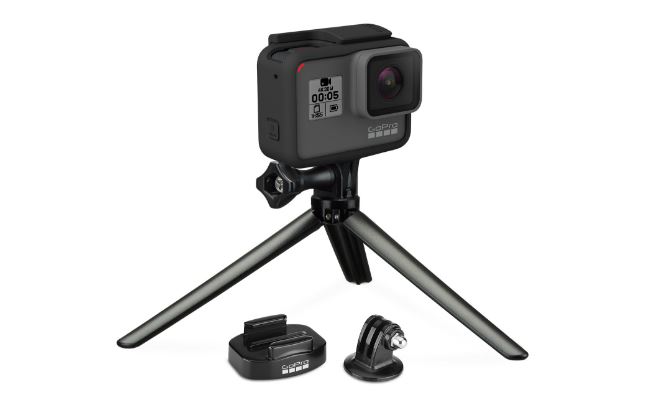
I don’t know about you but I prefer to fix my GoPro on my desk using the Joby Tripod, it provides stability for my camera so I’m sure it won’t fall off during live broadcasts.
Another advice is to use a GoPro frame (below photo of the frame compatible with Hero5, 6, and 7), simply because it provides mounting legs.
Also, because using the waterproof housing will muffle the sound.
Hero8 and Hero9 cameras have folding fingers at the bottom so no frame is required.

You also might want to consider using a GoPro external mic for better sound quality as I find that the GoPro audio is not that great.
I’m sure many of you are excited to try this setup.
I personally have a GoPro Hero5 Black set up only for live streaming use, it’s always on my desk fixed on the tripod ready for capturing videos!
If you’re having trouble with the setup, watch this video by Gilly Gill:
How to Use a GoPro As A Webcam Without a Capture Card
Is it possible to use a GoPro as a webcam without a capture card? Yes, but ONLY with GoPro Hero 4 cameras.
And the end result is not what you really want: Low quality video.
I know some of you might be disappointed that you can’t use your new Hero cameras as a webcam.
That is the reason I mentioned at the beginning of this guide that the only way to get this working is by using a capture card.
If you have a Hero4 and still interested in trying this, then go to this guide, scroll down to the appropriate section and follow the steps.
If someone figures out how to use the new GoPro cameras as webcams without a capture card then it would be great if you can share the details and I will update this article for all the readers to see. 🙂
How to Use More Than One GoPro as Webcam
Some of my readers have asked me this question. They would like to use two or more GoPro cameras as webcams for Skype.
That is possible to do using the above setup. No need for another capture card, you only need one.
The only additional hardware is a simple HDMI switch that has 2 or more HDMI inputs and 1 HDMI output, something like this one.
You can connect both your GoPro to the HDMI inputs then the HDMI output to the capture card.
You can then switch between the cameras using the HDMI switch, you can only capture video from one GoPro at a time.
So the additional hardware you need is an HDMI switch, an extra micro HDMI to HDMI cable for the second GoPro and 1 HDMI cable to connect the HDMI switch to the capture card.
This setup can be useful for people who are looking to show different video angles on Skype or other applications.
Note: If you notice that the video is mirrored on Skype then don’t worry, the video won’t be mirrored to the people you’re Skyping with.
Frequently Asked Questions
1- Question: is DIGITNOW capture card compatible with MAC OS?
Answer: Yes, DIGITNOW capture device is compatible with most operating systems like Mac OS, Windows, and Linux. You just need a 3.0 or 2.0 USB port on your PC or MAC.
2- Question: Why when I connect my GoPro to the capture card the GoPro screen goes black?
Answer: This doesn’t happen to everyone but if it happens to you then you would need to change the following on your GoPro: Go to “Preferences” then under “I/O”, select “HDMI Output”. Set it to “Live”. You also need to make sure that the GoPro is being powered by an external 5 Volt USB charger.
3- Question: How can I connect an external microphone while my GoPro Hero5/Hero6/Hero7 is hooked to power?
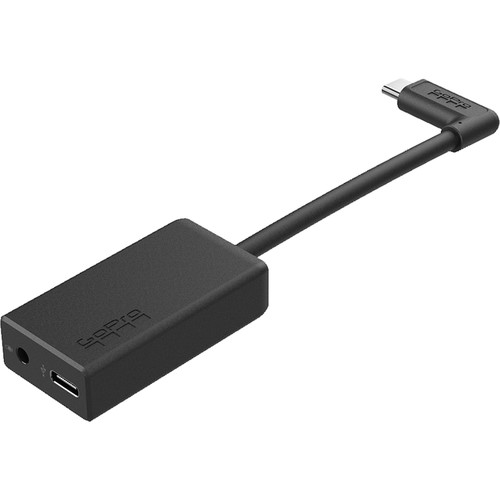
Answer: There is a USB-C port on the GoPro USB-C to 3.5mm adapter that you can use to power up the GoPro, and plug the external microphone at the same time.
4- Question: What capture devices other than DIGITNOW can I use?
Answer: I have personally tested the Magewell HDMI to USB Gen2 which is compatible with all operating systems. I have also used the Elgato HD60S and Mirabox.
5- Question: Is this setup compatible with GoPro Hero 4 Session?
Answer: No, since the 4 Session doesn’t have an HDMI output port.
GoPro Guide Recommendation
Check the GoPro Handbook to learn how to create awesome GoPro videos like a Pro. This e-book took me through a step by step process of creating the best footage a GoPro can produce. It has 130+ pages of valuable information for a very cheap price.
I hope you enjoyed my tutorial on how to use a GoPro as a webcam.
If you have any questions or if you would like to tell me what you think about this setup then feel free to leave a comment in the comments section below 🙂


December 19, 2020 at 12:36 am
Great info provided here. Thank you. My only question is: Do you know whether GoPro will update the firmware on the H9 black so that in webcam mode the audio features are active? Currently it is just the video. This would literally make the H9 black the only camera you will ever need. That is the last piece of the puzzle for me. Having to rely on the MacBook pro mic is ok, but GoPro have spent money on improving their mics and line in features. This would be a fantastic update.
July 18, 2020 at 12:03 am
I went through this guide with a Hero 7 Black and ended up using a $30 video capture card on Amazon and it works on both my Windows 10 PC and my Macbook pro on Catalina version 10.15.5.
Just wanted to share the cheaper video card option to save some folks money and research time. The name of the video card on Amazon is
“LEADNOVO Audio Video Capture Card, HDMI to USB 3.0 [2020 New Upgrade], Full HD UP to 1080P 60fps Live Video Recorder Game Capture Card for Laptop High Definition Acquisition, Live Broadcasting”
Works like a charm. I also paired this up with a light ring and couldn’t be happier.
July 19, 2020 at 3:11 pm
This is great! thanks for the information Jon.
June 10, 2021 at 3:26 pm
Nice detailed post here Micheal, thanks for going to all this effort to help people!
I’m also using a Hero 7 Black on macOS and found that I only needed the capture card, did not need to install OBS. It is however a bit laggy, but I think that’s because I purchased a cheap low quality capture card for about $15.
I wonder if OBS could improve the lag? Does this software provide configuration that could allocate more system resources and reduce the lag? Or is that all handled by the capture card itself?
Thanks
July 16, 2020 at 1:48 am
There is no HDMI output on Hero8?
July 16, 2020 at 2:12 pm
Unfortunately not, you need the Media Mod.
June 10, 2021 at 6:46 pm
The Hero 8 seems like a bit of a fail in my opinion. The only notable features it adds over the Hero 7 are the foldable built-in mount and a new wind resistant microphone. But then it’s lacking a removable lens cover and HDMI output. I generally recommend people buy a Hero 7 if they’re just starting out or a 9 if they’re upgrading from 7 or below. What your thoughts on this Michael?
June 11, 2020 at 10:00 pm
Hi! Thanks for your guide!
Question: I have a Hero 4 silver and it does not seem to have the option to put the output on ‘live’ like you describe in step 1. How does this work voor my GoPro?
kind regards,
Matthijs Numan
June 11, 2020 at 10:29 pm
Hey! You can actually skip this step if you have a Hero4 Silver. The only annoying thing on the 4 Silver is that you won’t be able to use the screen after you plug in the HDMI cable. So make sure that you change your settings before connecting the HDMI cable.
June 12, 2020 at 3:47 pm
ah! great thanks for your swift response!
May 27, 2020 at 12:16 am
Hi Michel, I have a GoPro Hero 6 Black. I have video and audio in OBS. My problem is when I connect either a usb-c to usb-c cord or the GoPro power cord to my Mac, my screen turns black with a USB Connected graphic showing .
May 27, 2020 at 2:47 pm
Hi Jason, make sure you connect your GoPro via USB to an external power source and not to your MAC USB port. Also, as I said in step#3, you need to Go to “Preferences”, scroll down to find “Input/Output”, scroll down and select “HDMI Output” then choose “Live”. Try it and let me know if it works.
May 19, 2020 at 12:24 pm
I just wanted to say thanks for an excellent and simple guide. I haven’t tried it yet – waiting for deliveries of a GH8 Black and the video capture card etc. But with ‘lockdown’ and working from home, this should be an excellent way to improve videoconferencing.
So, Michel, thanks.
May 19, 2020 at 1:33 pm
Hey, I’m glad you found my guide useful! Did you also order the GoPro Media Mod? You will need it with the GoPro Hero8 Black.
Please feel free to contact me if you need any help with the setup 🙂
April 15, 2020 at 8:20 pm
Hi EVeryone,
I just bought the Hero8 and want to stream via OBS on a new Mac, I went for a cheaper version which didn’t work. Two questions
Did anytone with the above buy the Digitnow USB 3 and it wor
~Did anyone buy a different card and it works with the same Go Pro.
The prices are triple what they were for this one. Any alternative recommendations?
Many Thanks
Jason
April 15, 2020 at 9:51 pm
Hi Jason, you can check the Mirabox, it’s cheaper and it is compatible with MAC computers. I haven’t tested it personally but it should work. What is the issue you are facing with your current capture device, the setup is straight forward and should work with any camera that has an HDMI out port.
April 7, 2020 at 3:07 am
Hello, windows doesn´t detect my go pro hero 4 as a web cam, do you know if I need to instal a controller or software ??
April 7, 2020 at 11:21 am
Hi Sergio, how did you do the setup? can you provide some details? Windows will detect your capture device, so in Skype for example, you need to select your capture device as your camera.
February 15, 2020 at 3:42 pm
You say in the post that this posible for Hero 7. But only the black version correct? I own a Hero 7 silver and only have one USB-C port and no HDMI output.
Thanks.
March 19, 2020 at 10:06 am
Sorry it was a mistake and I corrected the article. As you said, the Hero7 Silver can’t work with this setup since it doesn’t have an HDMI port.
December 28, 2019 at 1:22 am
guess it does not work on hero 8.
March 19, 2020 at 9:53 am
It does, but you need the GoPro Media Mod
June 16, 2019 at 3:49 am
Hi There – I picked up the Digitnow HD Video Capture to connect my GoPro Hero3 based on this article and am not able to get the video to show on my macbook/skype or OBS.
I can’t for the life of me figure out what I’m missing.
GoPro hero3 is set to 1080/60fps
MacBook Pro is USB 3.0
GoPro is connected to external power and is on
The only thing I can think of is that maybe the micro hdmi cable is faulty or not up to par?
Has anyone else had similar issues?
June 16, 2019 at 3:58 am
Update – Works on my PC, but not on MacBook Pro.
I’ve verified that MacBook is USB 3.0 (at least that’s what it says in the System Information)
June 16, 2019 at 4:55 am
Hi There and sorry for the serial posting –
Only thing I can think of is that something isn’t compatible with OS Mojave. I read some reports from GoPro users having lots of issues just getting their GoPro to be recognized after upgrading to OS Mojave…
November 2, 2018 at 8:22 pm
Hi Michel,
I have GoPro hero 3 and I try to connect as webcam. I Instal OBS and i try to add Video Capture Device. A new window will open, so I try to choose device, but i cant choose any device because my pc dont see any connected device…
What can I do?
thanks
November 2, 2018 at 9:48 pm
Hi Filip, which capture device are you using?
September 29, 2018 at 5:50 pm
Hello Michael! Would this work without a capture card? Im gonna record a very small screen so I dont mind quality…as long as it works?
Best Regards, Eric
October 14, 2018 at 1:40 pm
Hi Eric, check my other article: How to stream from GoPro
September 25, 2018 at 2:07 am
I have everything plugged in correctly, but when I go to OBS and to add the video capture device the only option showing up is the camera on my MAC. I’m using the HD Capture Pro.
July 7, 2018 at 9:59 pm
Michel,
Awesome article! Exactly what I was looking for. I’ve ordered all the equipment and will be testing this out soon. This may be a dumb question, and or I’m just missing the obvious, but is it possible to record the streaming video using this setup. Id like to livestream and simultaneously capture the video to edit down later.
Hope that makes sense. Thanks in advance for your consideration.
Keep up the great work.
Cheers
June 23, 2018 at 10:26 pm
It seems the option to disable OSD is gone from the Hero 5 preferences menu. Any idea what to do now?
August 6, 2018 at 4:12 pm
Hi Barry, you you go to “HDMI Output” in the settings, it will show you three options: “Monitor”, “Media” and “Live”. Choose “Live”
June 8, 2018 at 4:01 pm
Hello Michel,
thank you very much for the tutorial!
I am on Ubuntu Studio 16.04, and I can access the camera, however the image appears as if there were a filter, very distorted, this problem does not happen in windows or mac, any idea why this might be?
Many thanks in advance!
Jorge.
April 27, 2018 at 9:11 pm
Hi, thanks so much for this post. Only issue for me, I have a Hero 6 and when I hardwire in with HDMI my screen goes black and I lose all my touchscreen controls. I tried the media setting as you suggested in this and I still have a black screen. I also tried the Live and Monitor settings as well and that did not work. Any other things to try? The problem I have with this —I can’t hold the zoom I want on linear shooting. I am using OBS as well for a live streaming show.
February 23, 2018 at 10:37 pm
Hi Michel! Does this work for El Gato HD60? I have everything set up, and no live feed on OBS 🙁
March 11, 2018 at 1:19 pm
Hi Ben, sorry haven’t tested the Elgato HD60
February 20, 2018 at 3:49 am
I’m having thw same issues mentioned in a previous comment. Everytime I connect my GoPro Hero 5 to the AGPTEK capture card it puts me in media mode and does not let me see the screen anymore or allow me to record. Not certain where to go on here.
Jeff
February 20, 2018 at 2:21 pm
Hi Jeff, There is a setting in your Hero 5 preferences under I/O, HDMI Output. You can choose between Live, Media and Monitor, make sure to set it to Media. Let me know if that works.
January 18, 2018 at 7:53 pm
Hi,
Currently in the process of setting up the above for my home studio..
On your post on mentioning how to set up the go pro, you said to dissable the lcd screen on the back. How do i go about doing this please? I’m running the hero 5 black like yourself..
Great post, many thanks
Greg
February 20, 2018 at 2:33 pm
Hi Greg, Swipe down to access the Settings and Connect options, Choose Settings/preferences,find the setting for OSD which stands for “On Screen Display” and turn it off.
January 15, 2018 at 9:41 pm
Hi Michel,
What about AGPtek & Elikliv capture cards?
I have GoPro 3.5mm audio adapter with Hero 5 Black; I believe I can charge camera from external source and input audio using GoPro 3.5mm audio adapter and get video/audio out using micro HDMI, feed it to any capture card (AGPtek or Elikliv) then get audio and video in OBS for live streaming, correct? Or I have to input audio on video capture card or computer?
Above mentioned cards have audio input.
Farhan
January 16, 2018 at 9:43 am
Hi Farhan, I use AGPtek never tried the Elikliv capture card.
You can charge your camera using the USB cable from an external source and use the micro HDMI cable to connect it to the capture card.
You don’t need the 3.5mm audio adapter in this scenario unless you want to connect the GoPro to an external microphone.
January 15, 2018 at 6:01 pm
Hi, I wanted to ask if I could use the same gear for streaming with a dslr camera (Canon eos 80D).Thanks
January 16, 2018 at 9:39 am
Hey! you definitely can use the same gear to stream with a Canon dslr
December 25, 2017 at 1:08 am
Hello Michel,
Excellent post. Still working on figuring this out on my end. Everytime I connect my GoPro Hero 5 to the AGPTEK capture card it puts my gopro in media mode and does not let me see the screen anymore or allow me to record. All I see on OBS is my previous videos I have done that are saved to the GoPro. I have the gopro powered through an external 5v plug as per your instructions. Is there something else I am missing.
December 14, 2017 at 1:43 am
Thank you Michel for all reviews with very usefull info and hints. I’m thinking of using this solution, what I need to check is about external microphone. Since Gopro5 has only one USB port which I would use for powering, the only possibility to connect external microphone is directly to PC and mix it with OBS. Am I right?
thank you
Peter
December 14, 2017 at 1:49 pm
Hi Peter, glad you liked the reviews 🙂 That’s correct, you would need to connect the external mic to your PC and then set it up as the audio input in OBS. Let me know how it goes. Take care!
November 26, 2017 at 12:33 am
Hello Michel:
Excellent, useful information. I’m a dentist using a BackBone modified GoPro 6 connected to a surgical microscope, to record into an iMac. Using a Magewell 2 HDMI to USB, capturing in QuickTime, but I can only record at 720 not 1080. Can you suggest why I am limited to 720?
Thanks
Mark
November 28, 2017 at 6:21 pm
Hi Mark, that’s weird. Are you capturing at the highest resolution in QuickTime? In QuickTime Player, choose File > Export then select 1080p from the Format menu.
November 6, 2017 at 3:58 pm
Hello very good tutorial I got a question for you, I have seen this capture card that has a very good price I think but some people are telling me that doesn’t work for that would you confirm that please? The card is “Razer Ripsaw game capture card”
November 6, 2017 at 4:27 pm
Hi Juan, I had a look on the Razer Ripsaw game capture card and it looks fine to me. It has a USB 3.0 port and an HDMI IN port. It’s also compatible with OBS so I don’t see any reason why it wouldn’t work with a GoPro.
November 3, 2017 at 4:52 am
Hello, thank you for your tutorial. I am having an issue when I plug in the USB cable to my mac it automatically turns off my webcam from shooting the video to charging. Is there a way that I can keep it plugged into the usb so it charges, but continue to use the camera for my webcam?
November 6, 2017 at 4:23 pm
That’s normal. As I mentioned in the tutorial, you would need to connect the GoPro’s USB to a power outlet using a 5V USB charger and not to your MAC or PC.
October 15, 2017 at 4:01 am
Thanks michel for you tuto !
Does the avermedia LGP Lite or AVerMedia Live Gamer Portable may works with a MAC ?
One more question if i want 2 gopro connected to my “mac” and use the advanced scene switcher in obs, does it works with an Avermedia + HDMI switcher. (does the switcher allow me to have the 2 videos stream in same time or i will need to manually switch the switcher ?)
I was thinking by get an avermedia for each gopro and connect them individually to my “mac” on usb.
For exemple with 2 gopro, i would have 2 avermedia and each avermedia connected in USB.
Thanks a lot
Morgan
October 15, 2017 at 12:22 pm
Hi Morgan, happy you enjoyed the tutorial 🙂
Unfortunately Avermedia doesn’t work with Mac because of incompatibility between Mac OS and Avermedia drivers, you can only use the Magewell capture device. if you want to use the advanced scene switcher in OBS (for automatic switching between the 2 GoPros) then you would need two capture devices. If you want to manually switch between your 2 GoPros then you can use a manual HDMI switch and only one capture device.
I have never tried setting up two capture devices but it should work. Let me know if you will try this setup, I would like to have your feedback!
Let me know if you have any other questions.
October 13, 2017 at 8:14 am
I started playing with this idea before I found your post here, very well put together!
I’m running into an immediate problem in that a) it won’t run without a battery inserted at all and then b) the battery is slowly dying – would get to 0% long before I’d be finished a stream.
How long do you get out of your setup?
October 13, 2017 at 5:00 pm
Hey there, glad you liked the tutorial. Why don’t hook up your GoPro to a 5V USB wall charger? This is what I do, I wouldn’t rely at all on the battery.
Should perfectly work and you can record for as long as you want.
September 18, 2017 at 12:51 am
Is it possible to add two (or more) video capture devices in OBS and then choose both capture cards in Skype so that you can switch back and forth between them and get multiple angles in your Skype session?
September 18, 2017 at 11:47 am
It’s possible to have 2 or more GoPro cameras on one capture card.
You don’t need an additional capture device. You would need an HDMI switch that has 2 or more HDMI inputs and 1 HDMI output, something like this one.
You can connect both your GoPro to the HDMI inputs then the HDMI output to the capture card. You can then switch between the cameras using the HDMI switch.
So the additional hardware you need is an HDMI switch, an extra micro HDMI to HDMI cable for the second GoPro and 1 HDMI cable to connect the HDMI switch to the capture card.
Please let me know if you need more help, I will be more than happy to answer your queries
Good luck with your setup!
September 18, 2017 at 12:37 am
Can you add two (or more) video capture devices in OBS and then choose both in Skype so that you have different camera angles for your Skype session? I understand I’d need the extra equipment for both GoPros to make it work if it’s possible.
September 3, 2017 at 5:03 am
Will this work with a session 5 ?
September 3, 2017 at 1:45 pm
No it doesn’t work with Session 5 because the session has no HDMI port. The setup works with Hero3/3+, Hero4 Black/Silver and Hero5 Black.
September 3, 2017 at 1:46 am
would a HornetTek 1080P / 60FPS HDMI to USB 3.0 Video Game Capture Device work for this?
September 3, 2017 at 1:44 pm
Never tried the HornetTek but looks like it can do the job. Just be careful with the operating system compatibility since some of these devices are only compatible with Windows and not MAC for example.
You should also check if this device has latency issues prior to making a purchase. That’s why I recommended the AverMedia Extreme U3 or the Magewell XI100DUSB HDMI since both have very low/no latency.
August 29, 2017 at 11:35 pm
You can use the GoPro without a capture card, as long as the computer has Wi-Fi. You should add that option to your tutorial.
August 30, 2017 at 2:12 pm
You can STREAM using WiFi but you CAN’T capture or use the GoPro as a webcam without a capture card and that’s the point from this tutorial. I have as streaming tutorial here.
August 2, 2017 at 5:40 pm
Hi Michel
Thanks for the tutorial. I am wondering if this works for Zoom video conferencing?
August 2, 2017 at 8:22 pm
Hi Alicia, if you can use your laptop’s webcam or any USB webcam with Zoom video conferencing then this setup should work. This setup basically enables you to use the GoPro as a normal webcam with any software.
July 26, 2017 at 10:54 am
Just received the Magewell capture device yesterday and tried it on both my Hero4 silver and Hero5. It works really well. Thank you very much!
July 24, 2017 at 3:58 pm
Hello, I try to use this setup and other ones too, but I only can see red screen in OBS, I try to find, how can I fix it but it didn´t work. Please help me. With my laptop camera it works, but with GoPro 5 black, which I bought especially for live streaming, no. Thank You for your help, Michel, or anyone else.
July 26, 2017 at 10:43 am
Hello! I use this set up with my GoPro Hero5 and it works perfectly. Which capture card are you using and do you have windows or Mac?
July 22, 2017 at 2:19 am
Hey Michel,
First of all thanks for your great tutorial! It is really useful. I even went to the shop today and bought the same video capture card as yours (Avermedia Extremecap U3). Basically I have the same equipment as yours here.
Unfortunately, I’m facing one sh*tty problem and been struggling with it 3 hours already. The OBS app can’t recognize the video capture as a source to stream from. It’s not on the list. I see that some other people here have the same problem but there seems not to be any solution to it. What is interesting is that Skype also can’t recognize the card. Only it’s software works (RECENTER). While reading tons of info on Google I came across some guy saying that the drivers for Mac are responsible for this and it cannot be fixed. They just don’t let the card to be visible on the computer, which is strange.
How did you manage to run this? I’ve downloaded the very last drivers and applications. I’m really struggling with this, because I bought this card with the idea that it will be okay for Mac OS 🙁 Could you please share some information please.
Thanks in advance!!
July 26, 2017 at 10:42 am
Hi there, glad you liked the tutorial 🙂 The Avermedia Extremecap U3 only works with Windows OS. You would need the Magewell if you’re using MAC OS.
July 2, 2017 at 11:59 pm
I have a Hero5 Black and can’t get this set up correctly.
Step 1 (Outcome)
Connect GoPro USB cable to your PC (Completed)
Connect the MicroHDMI cable from GoPro to the HDMI port AVerMedia ExtremeCap U3 (Completed – However; when I do this step, the GoPro’s Screen goes black and I can no longer see anything on it)
Connect the USB cable from AVerMedia ExtremeCap U3 to the 3.0 USB port of PC (Completed)
Step 2 (Software Downloaded)
Step 3 (I can only complete when the MicroHDMI cable is unplugged from the GoPro as when it is plugged in everything goes dark)
Step 4 (I can do all of these steps even though my ODS screens are different from the ones pictured however; I just get no signal message on the screen)
Any idea’s how to fix?
July 3, 2017 at 8:38 am
Hi Sandra, did you install the Avermedia ExtremeCap U3 drivers on your PC? What do you see in OBS once you finish from Step 4? have you chosen the Avermedia as the device selection in OBS as mentioned in Step4?
May 31, 2017 at 8:29 pm
Hello. I was wondering if anyone’s used this set up with WebEx? Thanks in advance!
June 1, 2017 at 11:17 am
Hello! This will definitely work with WebEx because WebEx uses the camera detected by your computer. And since the capture card transforms the GoPro into a webcam, you will be able to see it as a camera device in WebEx. Just make sure the capture card drivers are properly installed. You may also want to use a GoPro external mic for better quality audio for video conferences. Let me know how it worked for you.
Cheers!
Michel
May 23, 2017 at 5:36 pm
Hi,
Thank you for this. I’m planning to start shooting videos for my YouTube channel and I own a GoPro Hero4 Silver. Would this setup work? I’m looking at the Magewell capture device for my iMac. I just want to be sure that I will be able to record the videos directly to my computer in full HD? should I use OBS? I have a good graphics card. Let me know if that would be possible. Thanks again for this great article.
May 24, 2017 at 7:00 am
Hey there, this setup will definitely work. I use my GoPro Hero4 Silver as well with a Magewell capture card and OBS software in order to record videos directly to my PC, I then upload it to my YouTube channel, some other times I use it for Skype!
You can shoot HD or full HD that’s up to you to decide. But yeah don’t worry you will be able to take full use of your GoPro high quality resolution. Please let me know if you need any help or have any more questions! Cheers 🙂
May 1, 2017 at 1:52 am
This is a neat! I was thinking of what I can use as webcam when I finally start streaming, and I always wanted a GoPro but never bought one since all my gamer friends say it’s bad as far as a webcam goes. Your article gives me hope thanks for posting this!
May 2, 2017 at 7:07 am
Hi Chris, I’m glad I could help! Ping me if you have any questions
April 27, 2017 at 3:39 am
Did you tried with blackmagic capture card?
I have the Blackmagic design intensity extreme. Worked before, but now i just get blackscreen.
April 30, 2017 at 1:15 pm
Yes, I have tried it and it works perfectly. Have you changed anything in your setup (PC operating system, updates, etc..)?
March 19, 2017 at 12:07 pm
Hi,
I bought the Avermedia extremecap u3, but my laptop usb port has only an 2.0
So, the capture device don’t recognized this system because i must have an usb 3.0 on my laptop.
Is there any solution for this?
Laptop: Acer Asphire. See the link below:
http://www.trustedreviews.com/acer-aspire-5749-review
March 29, 2017 at 11:10 am
You will need a USB 3.0 port. Did you install the Avermedia driver on your laptop?
March 19, 2017 at 8:54 am
I have a new Hero5 Black GoPro and I was planning on using it to livestream so I bought an AverMedia Live Gamer Extreme video capture card, as suggested by your article.
I’ve downloaded OBS and the driver software for the capture card. I plugged the micro HDMI into the GoPro, and from the GoPro directly into the capture card. Then, I plugged the capture card into my computer via HDMI and of course the USB 3.0 to provide power to the capture device.
But when I open the software for the capture card, my GoPro isn’t showing. Maybe not a big issue. The bigger issue is that when I try to add my capture device to OBS, OBS isn’t suggesting it as a viable source. So what am I doing wrong? The GoPro IS powered on, everything is downloaded… I’m not sure what I’m doing wrong. Unless the capture device isn’t compatible with the 5 or something.
Also, I’m running Windows 10 on a Samsung laptop that I just bought less than a week ago so I don’t think anything on my computer is out of date.
Any suggestions
March 29, 2017 at 11:14 am
Hey Austin, you don’t need to connect the PC and capture card with an HDMI cable, only the USB cable coming from the capture card. HDMI should only connect your GoPro and capture card. Try it and let me know
March 3, 2017 at 1:50 am
What if you have an HDMI port on your computer already?
March 29, 2017 at 11:08 am
It doesn’t work, you need a capture card. The port on your computer is to output video only.
February 1, 2017 at 7:51 pm
Hi Michel, Will these intructions also work with the Hero5 Session?
March 29, 2017 at 11:06 am
Hey, unfortunately not. The session doesn’t have the required ports
January 8, 2017 at 1:48 am
Hey there! I’ve been searching a new webcam so that I can use it for my live streaming on twitch. To be honest I didn’t know that I can use the gopro. I have my gopro here lying around and I just use it when I go travel. I really appreciate that you share this. Now I can use my gopro as my webcam and also I can disconnect it and use it during my travel. Thank you!
December 14, 2016 at 7:29 pm
hola buenos dias, mi pregunta es si funciona todo esto con macbook pro 2012?
encontre esta capturadora no estoy seguro si funciona con mac
November 21, 2016 at 7:35 pm
Hey thanks for the tutorial ! I have a GoPro Hero+ which has a micro-usb port and NO HDMI output port.
Is it still possible to get the live video feed by some means? Please Help ! Thanks 🙂
November 22, 2016 at 11:13 am
Hey there, you can try to stream from your GoPro using WiFi (I guess the Hero+ includes WiFi). Let me know if it works 🙂
February 8, 2017 at 6:30 pm
Hey Michel,
First of all great Setup but I hope i´ll get an answer since this article isn´t that new anymore. Im using the GoPro Hero Black 5 and this capture card: https://www.amazon.de/AVerMedia-C875-Portable-Capture-mehrfarbig/dp/B00B2IZ3B0
Now my problem is, as long as I connect the GoPro via USB-C to USB3.0 cable with my computer to recieve power i can´t capture anything. It just shows “USB connected” on my screen.
I am new to GoPro, it it possible that i don´t understand how to start a Video capturing while charging? Or is it not possible to do so. Because on the Hero 5 there are just 2 Buttons ( Mode and the Play Button ) so I don´t think that there are many options :). Without charging it is working like it should.
Hope you can help.
Greetings from Germany
March 29, 2017 at 11:15 am
Hi Niko, did you connect the HDMI cable between your Gopro and Avermedia capture card?
November 6, 2016 at 4:52 am
I have done everything correctly, but it is not working. I get a different window when I add a new device.
November 6, 2016 at 12:57 pm
Can you give me more details please? Which capture card are you using and have you installed the drivers?
November 4, 2016 at 2:08 pm
Hey Michel,
Thanks for the Tutorial.
I was wondering if you knew how to stream video with the gopro (set up just like you explain) but record the sound with a tablemix (XONE23c) just like Boiler Room do ?
Thanks,
November 6, 2016 at 12:56 pm
Hi Louis, for capturing video just use the set up you saw in my article above. What’s is the type of input on this tablemix XONE23C? Check my other article GoPro external microphones to find more details on how to record better audio quality with your GoPro.
Let me know if this helps!
October 27, 2016 at 2:50 am
Hi, thanks for the tutorial !!
I have question for someone can help me, if i want add another gopro, and why not 3, it’s possible only with usb & OBS ? No need acquisition card ? Only usb is ok ?
I want to stream 3 gopro with different vues on facebook…
I have 3 Go Pro, 1 Macbook Pro (2016) and want stream on Facebook live
Thanks
November 2, 2016 at 11:30 am
Hey there, you won’t be able to see use the GoPro with OBS unless you have a capture card. It won’t work with only a USB cable.
If you would like to stream then check my other article that explains how to stream from GoPro to PC or Mac. Hope this helps!
September 23, 2016 at 8:04 am
Thanks for the tutorial! Have you had/heard of using a GoPro as a webcam causing any lag when used with Skype? I’m wondering if the higher video quality might slow things down.
September 24, 2016 at 1:03 pm
Happy you liked the tutorial! Well it all depends on you computer specs and capture card. I personally don’t have any lag issues when using my GoPro as a webcam since I use the Avermedia capture card. Also make sure to set your video resolution to no more than 720p 30fps.
Let me know if this helps!
September 24, 2016 at 5:30 pm
Excellent! Thanks for the response!
September 9, 2016 at 8:58 am
Hi Michel, did you know if this article works like the video a capture card? https://www.amazon.com/StarTech-External-Monitor-Graphics-USB32HDE/dp/B00612ZPQA/ref=sr_1_2?s=pc&ie=UTF8&qid=1473395906&sr=1-2&keywords=usb+capture+hdmi
September 14, 2016 at 9:52 am
Hi Fabian, the card in the link you provided is a graphics card and not a capture card, so you won’t be able to use it in order to capture videos from a GoPro or any other source.
July 16, 2016 at 2:11 am
If i plug in my hero 3+ in to the hdmi port on my graphic card it works also? Or i need that avermedia extra?
July 24, 2016 at 6:23 pm
Is it a normal graphic card? probably it’s an HDMI output and not input like the Avermedia card
July 12, 2016 at 6:14 am
Does this work with the Hero 4 Session?
July 13, 2016 at 3:46 pm
unfortunately not, since the Hero4 session doesn’t have a micro HDMI output
January 14, 2018 at 9:47 pm
Will a micro usb to hdmi cable resolve this?
January 15, 2018 at 10:03 am
Unfortunately not, I wish it was that easy 🙂 You will need the AGPTEK or similar device to capture the videos.
July 10, 2016 at 4:53 pm
Is it possible to capture also 60fps with hdmi out?
July 13, 2016 at 3:40 pm
Yes, you can capture up to 60fps using the Avermedia card
May 4, 2016 at 1:21 pm
thanks for this tutorial. everything works until step 5. I’m not able to select my video capture device (Elgato Game Capture HD60) in Skype. It just doesn’t show up in the settings. Any advise?
May 5, 2016 at 12:12 pm
Glad you liked the tutorial!
Are you sure the capture card drivers are properly installed? Does the card show up in OBS software?
Let me know..Thanks
May 6, 2016 at 11:44 pm
I’m also having the same issue here with my hd hero 4. and yes, with obs software the video is captured properly.
May 7, 2016 at 7:29 pm
Which capture card are you using?
April 8, 2016 at 9:43 pm
Hi Michel,
Thanks for the tutorial. But I find the video capture cards that you presented quite expensive – is there any other cheaper alternative to set up gopro as a webcam?
Thanks!
April 10, 2016 at 3:50 pm
Hey there, I’m glad you liked the tutorial!
I personally use the Avermedia capture card since some time now and I’m very satisfied with the quality it delivers and that’s why I included it in this tutorial. I always pick high quality stuff for my computer and this one is a must have if you want the BEST quality possible for capturing videos. There a lot of cheaper cards out there but they will never perform like this one. There are also more expensive cards that deliver less quality.
I hope this helps!
Michel
March 23, 2016 at 12:29 pm
Great idea! I am getting a GoPro in the next few days for my mountain biking. I am glad I read this Because I didn’t know you could use it for a webcam. I usually just use my computer’s small camera, but not I might actually try this one out!
Thanks for the great read, keep it up!
Thap P. Gymbulk fitness
March 23, 2016 at 12:37 pm
Hey there! I went on a mountain biking trip in the weekend and it was great, I used my GoPro hero4 black and took awesome videos! I will also post an article about mountain biking and GoPro this week 🙂
When you get your GoPro, you should definitely try this setup, the resolution is SO much better than the normal webcam! Thanks!
February 19, 2016 at 6:37 pm
This is really helpful. I already have a suitable capture card in my PC that I have never used. I have not heard of OBS though. Is it a good stable program running on Windows 10? Do you recommend any particular brand of HDMI cables? Keep up the good work.
Mike.
February 20, 2016 at 7:12 pm
Hey Mike, OBS is a very good and stable software indeed, I myself run it on Windows 10 without any compatibility issues. Any high quality HDMI cable will do the trick, I don’t use a particular brand honestly. When using OBS make sure to set your GoPro video resolution at no more than 1080p, best for live streaming and webcam (skype) use.
Cheers! glad you liked the guide 🙂
February 5, 2016 at 5:02 am
Hi Michel, this is great information because I had no idea that GoPros could be used as webcams. I liked how you explained how to get the highest definition out of it, since most webcams I’ve seen don’t have the great picture quality.
February 6, 2016 at 4:44 pm
Exactly what you’re saying Jon! Most webcams do not have good quality, so why not use your GoPro instead! 🙂
February 1, 2016 at 10:56 pm
Thank you so much for this easy step to step guide, I bought my daughter a go pro for christmas and she loves to use skype and other video media to call her school friends.
i will certainly show this to her
February 2, 2016 at 10:24 am
Hey Steven, I’m sure the guide will be very useful for her, just the right time!
Let me know if you need any help
Thanks
February 1, 2016 at 10:40 pm
Had no idea a gopro could be used as a webcam, the way you explained the installation was so helpful and brilliant. Easy to follow and clear steps – perfect.
February 2, 2016 at 10:23 am
Yep, many people don’t know it but you can practically transform any video camera to a webcam or to live broadcast videos.
Thanks Uwais, glad you liked the guide!
January 30, 2016 at 10:16 pm
Great and awesome how-to bud. As a fellow techie myself, it’s always good to see people helping other people out with technology. Simple and easy to understand with the appropriate pics to go a long with. Lots of good things can be done with everyday technology when knowing what you can do with it.
January 31, 2016 at 6:04 am
The setup is really easy, it just takes couple of minutes to do the connections and setup the OBS software.
What’s better than sharing knowledge and helping other people 🙂
Glad you liked the guide Chris! Thank you
January 30, 2016 at 8:43 pm
Hi Michel,
I have been using OBS a lot in my past and I can say for sure it is a wonderful program, and it is totally free as well. It’s really cool that you can connect a GoPro to it as well, never thought of that. More uses for my GoPro! It has been catching a bit of dust lately, so happy to find this article.
Thanks for sharing
January 31, 2016 at 1:13 am
Hello Sylvester 🙂 well me too, I have been using OBS Since a long time for video recording. I was always trying to figure out a way to make the Gopro work through OBS and it finally worked. Let me know once you try it! And don’t hesitate to ask in case you have any questions.
Thanks 🙂
January 30, 2016 at 12:42 pm
This would be a wonderful gadget to have especially for those who want to promote their businesses online. I can just imagine the different usages this gadget can be associated with. I have seen some really crappy videos made and posted on youtube by friends who are utilizing their built in webcams on their laptops it looks as if they are doing the old dance “The Robot”.
January 30, 2016 at 1:22 pm
Hi Troy, exactly what you just said. Many people use their laptop or PC webcam that delivers bad quality videos, so if they own a GoPro then why not take the advantage and use it also as a webcam.
Thanks! 🙂